Planning a 6-day Kilimanjaro trek requires three main pillars: booking a licensed tour operator, scheduling sufficient physical training, and assembling proper gear. Your first step is to choose a route like the Machame or Marangu trail, then secure permits through a registered agency
6-days-ultimate-kilimanjaro-climb-via-machame-route
6-days-kilimanjaro-climb-via-umbwe-route
6-days-best-kilimanjaro-climb-via-marangu-route
1. Select Your Route
Choosing the right path for your Mount Kilimanjaro expedition is the first step toward a successful summit, and for those aiming for a 6-day itinerary, there are two distinct, well-established choices. The 6-day Machame Route, often referred to as the "Whiskey Route," is the superior choice for those who crave dramatic scenery and a more challenging, diverse landscape. It is widely praised for its exceptional success rate. This is primarily because the Machame Route naturally forces an ascent profile that honors the "climb high, sleep low" principle. By hiking to higher elevations during the day and descending to sleep at lower altitudes, your body is effectively trained to handle the thinning oxygen, which is essential for survival and performance at the peak.
Conversely, the 6-day Marangu Route—or the "Coca-Cola Route"—is the only trail on the mountain that offers accommodation in comfortable, permanent mountain huts rather than tents. This is a significant logistical advantage if you are someone who struggles with the idea of sleeping in a tent for six consecutive nights. The huts provide a level of shelter and communal interaction that can be very comforting during cold, windy nights on the mountain. However, because it is a "hub and spoke" route where you go up and down the same path, it lacks the ecological diversity of the Machame Route.
Ultimately, your choice depends on your priorities. If you are an adventurous hiker who wants to witness the mountain's changing ecosystems and wants the best physiological chance at summiting, the Machame Route is hard to beat. If your primary concerns are comfort, shelter, and a more structured nightly routine, the Marangu Route is your best fit. Both are classic, respected ways to conquer Kilimanjaro, but they offer very different experiences.
2. Physical Preparation
Conquering Kilimanjaro in six days requires more than just willpower; it demands a robust level of physical readiness. Because you will be trekking for 5 to 7 hours consecutively each day, your body needs to be conditioned for low-intensity, long-duration endurance. The most effective training programs begin several months in advance and incorporate a mix of cardiovascular fitness and muscular stability.
Focus your training on "Zone 2" cardiovascular work—activity that keeps your heart rate in a steady, aerobic range. Running, cycling, and swimming are excellent for this, but nothing replaces the specific demands of hiking. Whenever possible, perform long, weighted walks. Load your daypack with 5 to 8 kilograms of gear and hit local trails. This will train your body to manage the weight you will carry on the mountain while conditioning your legs, core, and shoulders. If you lack access to hills, the stair-master is your best friend; it mimics the repetitive step-up motion required for thousands of meters of elevation gain.
Beyond physical fitness, mental preparation regarding altitude acclimatization is vital. Read extensively on the symptoms of Acute Mountain Sickness (AMS). Recognize that regardless of your fitness level, the mountain does not discriminate; the thinning air affects everyone. The best defenses are staying hydrated—aiming for 3 to 4 liters of water daily—and maintaining a very slow, deliberate pace. Your goal during training should be to become comfortable with moving slowly for hours at a time. Do not overtrain to the point of exhaustion in the weeks leading up to your trip; instead, focus on consistent, steady progress that builds a strong aerobic base, allowing you to arrive at the trailhead feeling prepared, resilient, and ready to tackle the altitude one day at a time.
3. Gear and Logistics
The secret to thriving on Kilimanjaro is mastering the "layering system." In just six days, you will traverse five distinct climate zones, starting in a hot, humid tropical rainforest and ending in a freezing, arctic-like environment at the summit. If your clothing cannot adapt to these rapid changes, you will struggle. Your kit must include a moisture-wicking synthetic or Merino wool base layer, a warm fleece or down mid-layer for insulation, and a high-quality, fully waterproof and windproof outer shell to protect you from sudden mountain storms.
You do not need to purchase expensive, expedition-grade gear that you will only use once. Many aspiring trekkers find that the most logical choice is to rent technical equipment locally in Moshi or Arusha. Reputable tour operators provide top-tier rentals for items like four-season, sub-zero sleeping bags, insulated parkas, gaiters, and trekking poles. These rental shops are well-versed in the specific demands of the mountain and ensure that your gear is rated for the arctic temperatures of summit night.
However, prioritize owning and testing your own footwear. Your boots are your most critical piece of equipment. Buy them well in advance and "break them in" with regular, long walks; wearing new boots on the mountain is the fastest way to develop debilitating blisters. Also, pack a personal, well-organized daypack (about 30 liters) to carry your water, snacks, rain gear, and camera. Leave the heavy lifting to your porters, but keep your essentials accessible. By combining your own tried-and-true base layers and boots with rented technical gear, you create a balanced, cost-effective, and functional kit. Always verify your operator's specific packing list, as it will be tailored to your route and the season of your climb.
6-Day Kilimanjaro trek
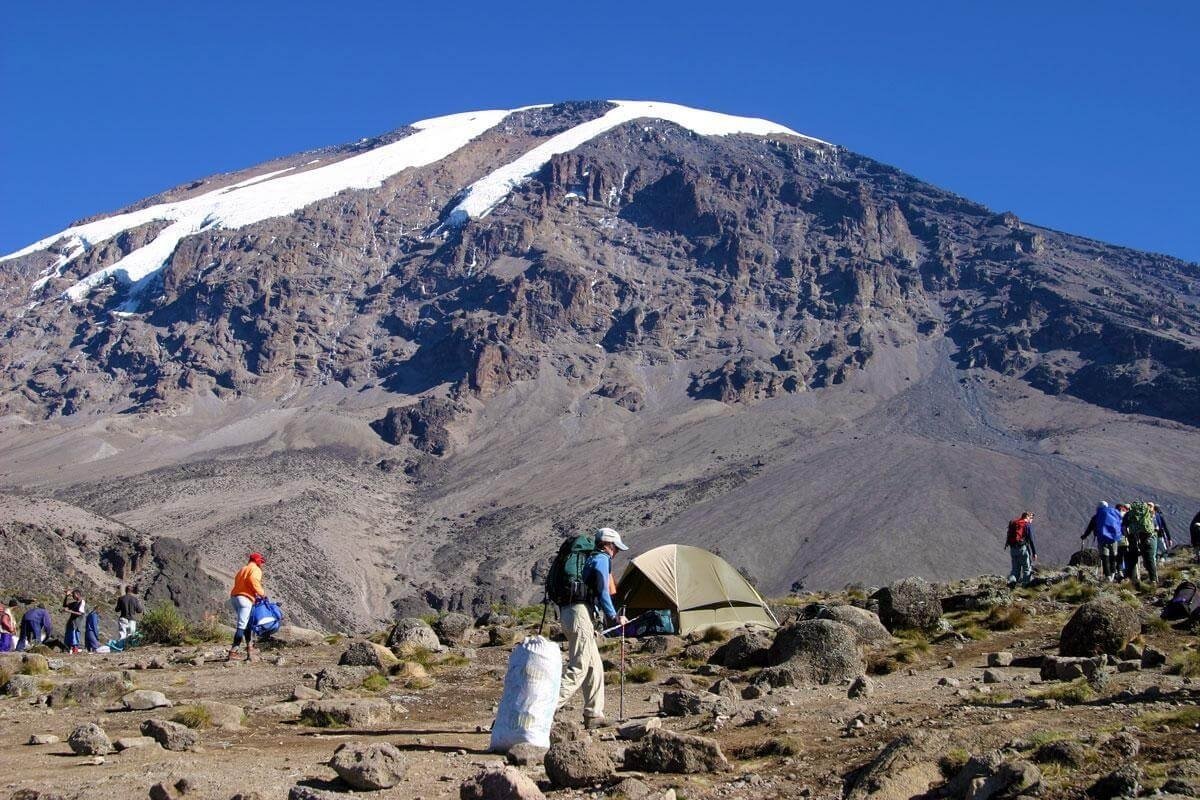
A 6-day Kilimanjaro trek is an exhilarating and demanding adventure that pushes your physical and mental limits. Spanning approximately 70 kilometers, this accelerated climb leads you through five diverse ecological zones—from vibrant montane rainforests to the stark, frozen lunar landscapes near the summit. Whether you choose the iconic Marangu "Coca-Cola" Route or the rugged, scenic Machame "Whiskey" Route, you are in for a profound mountaineering experience. Because this itinerary condenses the ascent, it requires rigorous preparation, exceptional hydration, and a disciplined approach to the pole pole (slowly, slowly) mantra. Successfully reaching Uhuru Peak at 5,895 meters in just six days is a monumental achievement, requiring expert guidance and a resilient mindset. As you navigate the thinning air and shifting climates, you will discover the true power of your own endurance on the "Roof of Africa," resulting in a life-changing expedition that stays with you long after your descent.
Day 1: Marangu Gate to Mandara Huts
Your journey begins at the Marangu Gate, where you complete the necessary park formalities before stepping into the lush, emerald-green montane forest. This initial stage of your 6-day trek is a gentle introduction, covering 8 kilometers in about 4 to 5 hours. As you climb from 1,870 meters to 2,700 meters, the air becomes cooler and noticeably fresher. The trail winds through dense canopies of ancient trees, tangled vines, and colorful wildflowers, providing a vibrant backdrop for your first day. Keep your ears open for the sounds of Sykes’ monkeys and diverse birdlife hidden in the canopy above. Upon reaching the Mandara Huts, you will find comfortable dormitory-style sleeping quarters. Take the afternoon to rest, enjoy a warm dinner prepared by your crew, and prepare your mind for the higher altitudes that await you as you move out of the forest tomorrow.
Day 2: Mandara Huts to Horombo Huts
Day two marks the transition from the lush forest into the heather and moorland zones. As you leave the Mandara Huts, the dense tree canopy begins to thin, revealing sweeping vistas of the mountain’s southern slopes. This 12-kilometer trek takes 6 to 8 hours to complete, pushing your elevation to 3,700 meters. You will notice the vegetation shifting to hardy heathers and giant lobelias, which thrive in this tougher, wind-exposed environment. The trail is steady but manageable, offering constant reminders of the massive scale of Kilimanjaro. As you approach the Horombo Huts, the views of the Mawenzi Peak become increasingly dramatic. Upon arrival, you will settle into your bunk, feeling the thinness of the air more acutely. It is essential to drink plenty of water tonight and focus on deep, rhythmic breathing to help your body begin its initial adaptation to the higher altitude.
Day 3: Acclimatization Day at Horombo Huts
On day three, your progress pauses for an essential acclimatization hike. This day is a strategic component of your 6-day trek, designed to help you beat altitude sickness. You will spend the morning on a short, 5-kilometer hike toward the base of Mawenzi Ridge, climbing to an elevation of approximately 4,400 meters. This "climb high, sleep low" activity allows your body to experience thinner air before returning to the 3,700-meter elevation of the Horombo Huts to rest. The hike provides spectacular photographic opportunities of the barren, lunar-like landscape that characterizes the upper reaches of the mountain. Use the remainder of the day to relax, play cards with your trekking group, and eat a hearty meal. By allowing your red blood cells to adjust during this crucial rest period, you significantly improve your chances of a successful summit push in the coming days.
Day 4: Horombo Huts to Kibo Huts
Day four is a striking trek across the "Saddle," a vast, arid plateau that sits between the two volcanic peaks of Mawenzi and Kibo. As you ascend from 3,700 meters to 4,700 meters over 10 kilometers, the landscape becomes almost entirely barren—a true alpine desert where little vegetation can survive. The 6 to 8-hour hike feels like walking across the surface of another planet, with loose volcanic scree underfoot and the massive Kibo cone looming ever closer. You will arrive at the Kibo Huts by late afternoon, exhausted but excited. This is the base for your final ascent, and the atmosphere in the camp is focused and intense. Your guides will conduct a final gear check and emphasize the importance of hydration. Eat your dinner early and try to get as much rest as possible, as you will be waking up around midnight for the summit push.
Day 5: Summit Day & Descend to Horombo Huts
The climax of your 6-day trek begins at midnight, under a canopy of brilliant stars. This final push is a grueling 6-kilometer climb to the summit, requiring immense mental fortitude as you face sub-zero temperatures and dwindling oxygen. Your goal is to reach Gilman’s Point (5,681 m) by sunrise, where the horizon glows with the first light of day. From there, you will push along the crater rim to reach the ultimate objective: Uhuru Peak (5,895 m). Standing at the highest point in Africa is a surreal, triumphant experience that makes every ounce of effort worthwhile. After capturing your memories, you will begin the long, careful 16-kilometer descent back down to the Horombo Huts. By the time you reach your sleeping bag, you will be deeply fatigued, but filled with the unparalleled satisfaction of having conquered the roof of the continent.
Day 6: Horombo Huts to Marangu Gate
Your final day on the mountain is a 20-kilometer descent that takes 5 to 7 hours, leading you back down from 3,700 meters to the Marangu Gate at 1,870 meters. The walk is a welcome change of pace, as the oxygen levels improve with every step, and you gradually descend back into the warm, lush embrace of the montane rainforest. Your knees may be tired from the long trek, but the sense of accomplishment makes the descent feel like a victory lap. Upon arriving at the gate, you will officially sign out of the park and be presented with your hard-earned summit certificates. This is the moment to share heartfelt goodbyes with your porters, guides, and cooks. A final vehicle transfer returns you to your hotel, where a hot shower and a comfortable bed await—the perfect ending to your incredible Kilimanjaro adventure.
1. Which is the best 6-day route for Kilimanjaro?
For a 6-day Kilimanjaro expedition, your primary options are the Machame Route and the Rongai Route. Selecting the right one depends largely on your personal preferences regarding scenery, difficulty, and crowd density. The Machame Route, often called the "Whiskey Route," is arguably the most famous. It is highly scenic, taking you through five distinct ecological zones and offering breathtaking vistas from the Shira Plateau and the southern circuits. However, its popularity means it can be quite crowded, and the trail is inherently steeper, which demands a high level of physical fitness to navigate within the compressed 6-day timeframe.
The Rongai Route, by contrast, approaches the mountain from the northern side near the Kenyan border. This is a drier, more remote, and generally quieter path. Because it sits in a rain shadow, you are less likely to encounter the heavy, muddy conditions that can plague the southern routes. The ascent on the Rongai Route is also noticeably more gradual, which many climbers find more manageable for their energy levels.
When planning, honestly assess your own trekking history. If you are an experienced hiker who wants the "classic" mountain experience and doesn't mind a bit of a challenge, the Machame Route is excellent. If you prefer a quieter, more isolated experience and a slightly less aggressive daily elevation gain, the Rongai Route is a fantastic alternative. Both routes are strictly camping-based, so you must be prepared to live in a tent for the duration of your trip. Regardless of the route, ensure you are booking with a reputable operator who can provide the necessary safety oversight for such an accelerated mountain schedule.
2. How difficult is a 6-day hike compared to longer routes?
A 6-day Kilimanjaro trek is classified as "strenuous" and "challenging," and it is undeniably more difficult than the 7- or 8-day alternatives. The primary factor here is physiology: the mountain does not change, but your time on it does. On a longer itinerary, you are given extra days—often called "acclimatization days"—which allow your body to naturally produce more hemoglobin and adjust to the lower oxygen pressure. By compressing the climb into 6 days, you effectively skip those critical physiological buffers, forcing your body to adapt much faster than is ideal.
Because you have fewer days to reach the summit, the daily physical demands are higher. You will likely find yourself walking for 5 to 8 hours daily, often with significant elevation gains. This back-to-back strain means your recovery time in camp is minimized, and the risk of cumulative fatigue becomes a real factor by day four or five. You are essentially asking your body to perform a high-altitude marathon while it is simultaneously struggling to process a deficit of oxygen.
Consequently, while a 6-day trek is perfectly achievable for someone in great shape, it is not a "leisurely" climb. It requires a high level of mental fortitude and physical stamina. You must prepare your body for this specific intensity by incorporating long, multi-hour hikes with a loaded backpack into your training. If you have any doubts about your ability to handle back-to-back intense days at high altitude, consider whether an extra day would not only make the trip safer but significantly more enjoyable, as you would have more time to appreciate the changing landscapes rather than focusing entirely on the grind of the ascent.
3. Will I get altitude sickness in 6 days?
Altitude sickness, clinically known as Acute Mountain Sickness (AMS), is a reality for a significant percentage of climbers on Kilimanjaro, and the probability increases significantly on a 6-day itinerary. Because the ascent is so rapid, your body is subjected to a massive change in air pressure in a very short window. Symptoms can range from mild—headaches, loss of appetite, fatigue, and nausea—to severe, such as dizziness, swelling, or confusion.
The key to navigating the mountain safely is to treat even minor symptoms with serious attention. While it is common to feel "off" as you adjust to the thin air, you must prioritize your health above your ambition. The mantra pole pole (slowly, slowly) is not just a suggestion; it is a physiological necessity. By walking at a very slow, controlled pace, you prevent your heart rate from spiking and allow your breathing to remain deep and steady, which helps oxygenate your blood more effectively.
Hydration is your second best defense. You should aim to drink 3–4 liters of water every single day. Even if you don't feel thirsty, keep sipping. Many climbers also consult their doctors about altitude medication, such as Diamox (Acetazolamide), which can help the body acclimatize faster by inducing a chemical adjustment in the blood. If you choose this route, test the medication weeks before your trip to ensure you don't have an adverse reaction. Most importantly, maintain open, honest communication with your guides. They are trained to monitor your pulse and oxygen saturation daily. If they tell you to rest or descend, do so without hesitation. Your ego should never take precedence over your physical well-being.
4. How should I physically train for the hike?
Physical preparation for Kilimanjaro is the single best investment you can make in your summit success. You should begin a structured training regimen 3–4 months in advance. The goal is not just raw muscle, but "mountain endurance"—the capacity to perform repetitive, low-intensity work for hours at a time. Your plan should focus on three pillars: aerobic conditioning, leg strength, and endurance.
Aerobic conditioning is the foundation. Activities like brisk walking, cycling, or swimming are great, but the best preparation is to replicate the mountain itself. If you live in an area with hills, start walking them. If you are in a flat area, a stair-stepping machine or a treadmill set to a steep incline is your best alternative. Do this for at least 45 to 60 minutes, 3–4 times per week.
Endurance is built through consistency and weight. Once a week, commit to a "long hike"—an outing of 4 to 6 hours on a trail that mimics the rugged, rocky terrain of the mountain. Crucially, wear the boots you plan to use on the trip, and carry a backpack loaded with 5–8 kilograms of weight. This conditions your back and core muscles to handle the daily load and ensures your boots are fully broken in, which is essential to avoid the blisters that ruin many climbers' experiences.
Finally, do not neglect core strength. Planks, squats, and lunges are invaluable for mountain stability. If you are diligent, you will reach the trailhead not just physically capable, but mentally confident. Remember, the mountain is not testing your maximum power; it is testing your capacity to keep moving steadily. Train your body to be a relentless, slow-moving engine, and you will find the 6-day climb to be a far more manageable experience.
5. Can I hike Kilimanjaro without a guide?
No, it is strictly against the law in Tanzania to hike Mount Kilimanjaro without a licensed and registered tour operator. This is not a policy meant to inconvenience climbers; it is a vital regulation designed for your safety and for the environmental preservation of the mountain. The climb is not a simple walk; it is an expedition that requires a skilled support team to handle logistics, medical emergencies, and the delicate ecosystem.
When you book a trip, you are essentially hiring a professional expedition team. This includes your lead guide, assistant guides, a mountain cook, and a crew of porters. These professionals are responsible for everything from setting up your camp and preparing nutritious, high-energy meals to monitoring your health and navigating the unpredictable weather.
When vetting potential agencies, you must do your due diligence. Do not look for the cheapest price, as these providers often cut corners on staff welfare, equipment quality, and safety protocols. Look for companies with high-quality reviews and, crucially, verify that their guides are certified Wilderness First Responders (WFR). A WFR-certified guide is trained to recognize the symptoms of altitude sickness, stabilize injuries, and execute emergency protocols if something goes wrong.
The mountain can be a dangerous place for the unprepared. By requiring licensed guides, the Tanzanian government ensures that you have the expertise required to handle the unique physiological stresses of the climb. Respect this regulation by booking early with a reputable, ethical company. The presence of a professional team allows you to focus on the challenge at hand, knowing that you have the support required to return from the summit safely.
6. What is the average price of a 6-day Kilimanjaro tour?
A quality 6-day Kilimanjaro tour typically ranges between $1,500 and $3,000 per person. This price variance is usually determined by the reputation of the tour operator, the size of your group, and the level of service included. While it might be tempting to shop around for the lowest possible price, it is critical to understand that on Kilimanjaro, you truly get what you pay for. Extremely cheap packages almost invariably cut corners in ways that directly impact your safety and comfort.
A fair price covers a significant number of fixed costs, most notably the mandatory park entrance fees, camping fees, and rescue fees charged by the Tanzania National Parks Authority (TANAPA). These fees are substantial and apply to every member of the support team, not just the climbers. Beyond park fees, your money pays for professional, experienced guides, a high-quality tent, a team of porters to transport your gear, and a mountain chef to provide three hot, nutritious meals a day.
When you see a price that is suspiciously low, ask yourself where the company is saving money. Are they failing to pay their porters a living wage? Is the food quality poor? Is the safety equipment—such as emergency oxygen and pulse oximeters—non-existent? Ethical, high-quality operators invest in their staff and their equipment. By paying a reasonable rate, you are supporting a sustainable tourism model that treats mountain workers with dignity and ensures you are climbing with a professional, safety-conscious team. Always treat your Kilimanjaro trip as a serious expedition and prioritize providers that are transparent about their safety records and their commitment to fair labor practices.
7. What gear do I need to pack?
Packing for Kilimanjaro is a balancing act; you need to be prepared for everything from tropical heat to arctic cold while remaining within your weight limits. The golden rule is to use a layered clothing system. You will need a synthetic or Merino wool base layer that wicks sweat away from your skin (avoid cotton at all costs, as it stays wet and makes you cold). For your mid-layers, bring a warm fleece or a synthetic insulating jacket, and for the summit, a high-quality down jacket is essential.
You must also have a waterproof and windproof outer shell—both jacket and pants—to survive the sudden storms that frequent the mountain. These layers should be breathable enough to wear while walking but robust enough to block gale-force winds. On your feet, invest in sturdy, broken-in, waterproof hiking boots. Pair these with moisture-wicking wool socks and liners to prevent blisters.
If you don't want to buy expensive, one-time-use items, look for rental services. Many reputable operators or local Tanzanian companies (like those in Moshi or Arusha) rent high-quality equipment, including four-season sleeping bags, heavy-duty rain pants, and trekking poles. This is a much smarter investment for most travelers.
Beyond clothing, ensure you have a 30-liter daypack to carry your personal essentials (water, extra layers, sunscreen, and first-aid supplies). The rest of your gear will be carried by your porters in a duffel bag. Finally, check your operator's specific packing list. They know the current conditions of your route better than anyone else, and their guidance is the final word on what you need to bring to stay comfortable and safe.
8. Do I need to carry all my own luggage?
No, you are not expected to carry the bulk of your gear. One of the most supportive aspects of a Kilimanjaro trek is the presence of your dedicated porter crew. On a typical trip, each climber is allowed a duffel bag (usually limited to 15 kg) that is transported by porters from one camp to the next. This allows you to walk with only your personal daypack, which usually contains your water bladder, extra layers, camera, snacks, and personal medical supplies.
This division of labor is essential for both your enjoyment and your safety. Your energy is a finite resource; by letting the porters handle the heavy lifting, you can maintain the steady, rhythmic pace required for acclimatization. The porters are incredible athletes who often move faster than the climbers to ensure that your tents are set up, water is treated, and the kitchen is ready before you arrive at your next campsite.
However, be respectful of the 15 kg limit. These bags are carried on the backs and heads of your support crew over challenging, rocky terrain. Pack only what you absolutely need, and keep your bag neatly organized so you can easily access items during the day if necessary. Pack your daypack carefully; it should be ergonomic and comfortable, as you will be wearing it for 6–8 hours daily. Keep your most important items—like your passport, extra batteries, and medications—in your daypack at all times. By working with your porters, you contribute to a positive, efficient, and respectful trekking experience for everyone involved.
9. What happens with meals and water on the mountain?
You will be well-fed and hydrated on the mountain. Your tour operator will have a dedicated mountain chef whose primary role is to ensure you have three hot, high-energy meals every day. Breakfasts typically feature porridge, toast, eggs, and fruit; lunches and dinners consist of hearty, carb-rich meals like pasta, rice, stews, and fresh vegetables designed to keep your energy levels up at high altitudes.
It is common to lose your appetite as you climb higher due to the thin air, but you must make an effort to eat, as your body is burning thousands of calories daily. If you have specific dietary restrictions, such as being vegan, vegetarian, or gluten-free, communicate this to your agency well in advance. They are well-accustomed to these requests and will plan the menu accordingly.
Regarding water, your support crew is responsible for collecting and treating mountain stream water. They will boil it or use chemical treatments to ensure it is safe to drink. However, you should bring your own 3–4 liter hydration system, such as a CamelBak, which fits into your daypack. This allows you to sip water continuously throughout the day without having to stop. Staying hydrated is your best defense against altitude sickness, so aim to empty your reservoir every day. If you prefer, you can bring electrolyte tablets to add to your water, which can help replenish the salts lost through sweating and keep your energy levels steady throughout the long trekking hours.
10. Are there bathrooms on the mountain?
Yes, there are bathroom facilities on the mountain, but it is important to manage your expectations: they are very basic. Most campsites feature "long-drop" toilets, which are simple outhouse structures over a pit. They are functional and provide a modicum of privacy, but they are not the luxury facilities you might be used to at home. They are shared by all the trekking groups in the camp, so they can get busy, particularly in the mornings and evenings.
If you are a traveler who values hygiene and privacy, many climbers opt to rent a "loo tent" or "private toilet tent" from their tour operator. This is a small, portable pop-up tent equipped with a chemical or portable toilet that is carried by your crew and set up specifically for your group’s use. It is a small investment that offers a massive increase in comfort and cleanliness, especially when you are tired and facing cold, windy conditions in the middle of the night.
If you need to use the bathroom while you are hiking between camps, you will have to find a private spot away from the trail, following the "Leave No Trace" principle. Ensure you carry a small trowel to bury waste, though in designated camping areas, you should always try to use the provided facilities. Bringing a bottle of hand sanitizer and using it religiously before every meal is the most important step for maintaining hygiene and preventing the stomach bugs that can occasionally afflict climbers.
11. What is the accommodation like?
On the Machame and Rongai routes, your accommodation consists of all-season, shared dome tents provided by your tour operator. These are not standard summer camping tents; they are technical, heavy-duty structures designed to handle the high winds, rain, and freezing temperatures found at high elevations. They offer a simple, warm, and secure shelter after a long day of hiking.
Your porters will carry the tents and set them up at each campsite before you arrive. You will also be provided with a foam or inflatable sleeping pad, which is vital for insulating you from the freezing ground. However, the most important part of your sleeping kit is your own high-quality, 4-season sleeping bag rated for at least -10°C to -15°C. Do not skimp on this—the mountain can get extremely cold at night, and a warm sleeping bag is the difference between a restful night and a freezing, miserable one. If you don't own one, it is highly recommended that you rent a professional-grade bag from your operator.
In addition to your sleeping tents, your camp will typically include a mess tent where you will eat your meals, socialize, and receive your daily safety briefings. This is the heart of the camp, where you can relax, chat with your fellow climbers, and enjoy the warmth of the group. The experience of living in a tented camp on the slopes of Kilimanjaro is a core part of the adventure, offering a simple, authentic connection to the mountain that you simply don't get in a hotel or a dormitory.
12. When is the best time to hike?
Choosing the right time to hike Kilimanjaro is essential for your comfort and safety. The mountain’s climate is governed by two distinct dry seasons, which are the only recommended windows for your climb. The primary season runs from January to mid-March. This is a great time to trek, as the weather is generally warmer and the skies are clearer, offering pleasant hiking conditions.
The second, and most popular, season is from June to October. These months offer the most stable weather, with low humidity, minimal rain, and spectacular, clear-sky views of the surrounding African landscape. July and August are particularly popular, but they also bring colder temperatures, so ensure your gear is ready for freezing nights.
Conversely, you should avoid the two primary rainy seasons. The "long rains" occur from mid-March to early June, and the "short rains" fall in November and early December. During these periods, the mountain is often shrouded in thick, freezing clouds, and the trails turn into muddy, slippery, and incredibly difficult paths. Climbing in the rain is not just unpleasant—it drastically increases the risk of hypothermia and makes the summit push exponentially harder.
When booking your trip, always check the seasonal trends. While it is technically possible to climb year-round, aligning your dates with the dry seasons ensures you can focus on the incredible experience of the trek rather than struggling with bad weather. Book early, especially for the high-demand summer months, to ensure you secure your spot with a top-rated operator.
13. Do I need a visa to enter Tanzania?
Yes, most international travelers require a visa to enter Tanzania. This is a standard procedure and is quite straightforward to handle. The most efficient way to secure your visa is to apply for an e-Visa online through the official Tanzania Immigration Department website. By doing this in advance, you can avoid long lines and potential administrative hurdles at the airport upon arrival.
When you apply for your e-Visa, ensure you have your passport (which must be valid for at least six months beyond your departure date), your flight itinerary, and your tour operator’s details ready. The process usually takes a few days to a few weeks, so don't wait until the last minute. Once your application is approved, print a hard copy of the authorization and keep it with your passport.
If you don't secure an e-Visa, you can obtain a visa upon arrival at Kilimanjaro International Airport (JRO). However, this can be time-consuming and sometimes requires cash payments in USD. Applying online is always the safer, more modern, and less stressful option.
Before you travel, always verify the latest requirements for your specific nationality. Immigration rules can change, and being informed is your responsibility. Having all your documents organized in a folder—passport, visa authorization, vaccination records, and trekking permit confirmation—will ensure that your entry into Tanzania is smooth, stress-free, and leaves you ready to jump straight into your pre-climb briefing and start your adventure.
14. Do I need any vaccinations?
Yes, preparing your health for Tanzania is a vital part of your trip. The Tanzanian government has specific requirements, most notably the Yellow Fever vaccination certificate if you are arriving from a country where yellow fever is endemic (such as Uganda, Kenya, or other parts of Central/West Africa). You must carry your original "Yellow Card" as proof; immigration officials will check this upon entry.
Beyond the mandatory requirements, visit a travel clinic at least 6–8 weeks before your departure. A medical professional can provide personalized advice based on your history and itinerary. Routine vaccines, such as Typhoid and Hepatitis A, are strongly recommended for travel to East Africa to prevent common illnesses contracted through food or water.
Additionally, talk to your doctor about malaria prophylaxis. While you will be at high altitude for most of the climb, you will be staying in lowland areas like Moshi or Arusha before and after the trek, where malaria risk exists. Medications like Malarone are commonly prescribed for this purpose.
Finally, keep a copy of your immunization records and health information readily available. Being prepared on the health front ensures that you aren't just protecting yourself from potential illnesses, but you are also fulfilling the legal requirements for entry. Your health is the foundation of your success on the mountain; don't leave it to chance. Start your medical prep early, and you will arrive in Tanzania ready to focus on your trek.
15. How much should I tip the trekking crew?
Tipping is a customary and essential part of the Kilimanjaro trekking culture. It represents a significant portion of the income for your support crew—the guides, cooks, and porters who work tirelessly to ensure your safety and comfort. You should plan to budget roughly $25 to $35 per day for the entire team, not per person.
At the end of your trek, you will typically have a tipping ceremony at the park gate. It is best to have this money ready in clean, crisp, new-series USD cash. Smaller denominations are helpful for distribution. Your lead guide will usually help facilitate the distribution among the team based on their roles and duties, ensuring the process is fair and transparent.
It is helpful to view the tip as a direct reflection of the crew’s hard work and the support they provided throughout your journey. These individuals often come from local communities, and your tip makes a tangible difference in their lives. If your crew went above and beyond—perhaps carrying extra gear for you or keeping morale high during a difficult summit push—you are always welcome to be more generous.
If you are ever unsure, don't hesitate to ask your lead guide during the trip. They are very familiar with these questions and will be happy to explain how the tipping is typically handled. Being generous, respectful, and prepared with cash at the end of your trip is the perfect way to show your appreciation for the people who made your Kilimanjaro dream a reality.
Booking 6 Days Mountain Kilimanjaro hike with us Roads of Adventure safaris
To book a 6-day hike with Roads of Adventure Safaris, reach out to their Uganda-based team to customize your Tanzania itinerary. A 6-day trek typically follows the Marangu Route (the only trail with hut accommodations), or a faster-paced Machame Route